This tutorial is pretty simple and to the point. I searched a while on Google for something that would explain how to import new head morphs that you make in the DA Toolset to the Character Creation screen with no successful results. So here I am making one for you. This is NOT a tutorial to replace the head of an existing character or to override any pre-existing head morph presets already available. So to clarify once more, this tutorial is going to show you how to bring your custom created head morph made in DA Toolset and make it available to use in the Character Creation screen for a NEW GAME.
This is an advanced tutorial, for those who are already familiar with file naming, locations and the DA Toolset. If you’re not too familiar then this tutorial may be of little help to you. If you have questions, feel free to comment. Also I am not walking you through the customization process for a head morph, if you’ve already got one ready to then that is great, if not make one in the toolset and then read on.
***If you already have an existing morph you would like to import then load up the toolset and open the file. Likely you saved this file as an .mrh so just open that up. If you are starting from scratch, once you have finished making your head morph read on.***
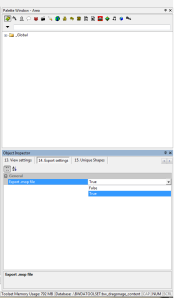
Go to Export Settings, change the setting: Export .mop file from False to True. (view screenshot)
Now save the file as a .mop; You will have to manually type .mop because it will be .mrh by default. (view screenshot). Doesn’t really matter where this file saves to (just remember where), so it would be best to just leave it wherever the default location is. You may also wish to save the file again as an .mrh if you think you may have use for it to edit again later down the road.
Now right click anywhere on the head morph and select Post to Local. (view screenshot).
Here’s the tricky part. Quickest way to do the next bit would be to go to File>>Open File and it should by default open up the location of your just saved head morph. Use the drop down and then go up to your module it will look something like this. (view screenshot)
Next right click on the core folder and click Open in a new window. (view screenshot)
You’ll see a bunch of folders, only one you need to worry about is the override folder. Open it, then open toolsetexport. You will now see the file that you need to move in order for the morph to show up in the character creator. (view screenshot)
Right click the file, Cut and then paste to your normal override directory where all your other mods are. Most likely the location for this folder will be:
On XP, the install directory is:
“C:\Documents and Settings\<username>\My Documents\Bioware\Dragon Age\packages\core\override”
On Vista and Windows 7 (32-bit and 64-bit), the install directory is:
“C:\Users\<username>\Documents\Bioware\Dragon Age\packages\core\override”
Once the file is in your override folder. We need to edit your chargenmorphcfg.xml (the one located in the same directory as your other overrides). Depending on how the file we just moved is named, we will have to declare it as a resource in the xml file. Since mine was an “ef” this means I will be putting my resource declaration in the <heads> <elf_female> section of the xml. (view screenshot)
As you can see I’ve added in a new resource declaration to the highlighted section, the file name shown is the one we just created and moved to our overrides folder. Save the xml file and close it as well as your toolset. You should now see your new morph in the character creation screen. Just an FYI colors and sizes may vary slightly when showing up in game, this is because they need to be rendered differently than in the toolset. (view screenshot)


